Join us on Facebook at Hop Stitch Jump and at Sock Monsters :)
It's all in the making!
Last week, I was approached by a fellow fabric crafter who was keen to know more about how Doodlebroidery is created. Here's how it unfolded!
I received an email early last week from a lady who had seen some of my Doodlebroidery that was given as a Christmas gift to her friend and wanted more information about its creation. I explained to her, as I do to everyone who asks, that customers send me their child's drawing either by email or in the post, and I embroider an interpretation of the drawing onto fabric. Sometimes the fabric is for framing, sometimes it's an apron or a shopper, and more recently I've been preparing some small pieces to be mounted in cards. Then it's all gift wrapped and sent out.
PING PONG! No sooner had I sent my reply email than another popped into my inbox from the same lady. "Thank you very much for your reply," it read. "I don't think I was clear enough in my question, sorry. What I meant was which embroidery machine and software do you use?" Erm, software? Embroidery machine? Are these trick questions?
All of my embroidery is done using a free motion embroidery foot, my two beady eyes and my two steady hands. A free foot works in much the same way as a standard presser foot, but instead of having the feed dogs move the fabric along in a straight line, it allows you to move your fabric around between stitches so that you can determine the direction and length of the stitch. Free motion machine embroidery has traditionally been used in quilting to create nice squiggly patterns rather than a traditional diamond shape, but it seems to have had an explosion in popularity in the last couple of years with many stitchy people using it as a way to "draw with thread". I begin by creating the outline of the image or drawing it with thread. Then I do any "colouring in" and I usually finish by adding any necessary text. The last step is to frame if necessary then do a bit of labelling and gift wrapping before sending off the parcel. And ta-daaah! A unique piece of fabric art, done!
Thank you very much Friend Of Customer! You gave me a great chance to reflect on my work and a boost in confidence that was much needed in the post-Christmas lull!
 |
| Doodlebroidery Cards |
PING PONG! No sooner had I sent my reply email than another popped into my inbox from the same lady. "Thank you very much for your reply," it read. "I don't think I was clear enough in my question, sorry. What I meant was which embroidery machine and software do you use?" Erm, software? Embroidery machine? Are these trick questions?
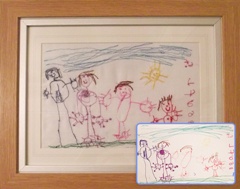 |
| Framed Doodlebroidery |
I was really, really flattered that she thought my work wasn't actually all mine, but that it was created by an automated machine; it felt good that she has such faith my translation of drawings. The thing is, it's not automated, not one stitch! Every part of every piece of Doodlebroidery is created using a simple domestic sewing machine. There's nothing complex or sophisticated about my machine - a bog-standard Brother JS-23 costing less than £70. In fact, although it was brand new when I got it, it was actually a gift from my sister to our Mum (who is an avid knitter) to get her started with machine sewing. It certainly isn't a fancy, computerised embroidery machine!
 |
| Stitching by numbers |
Thank you very much Friend Of Customer! You gave me a great chance to reflect on my work and a boost in confidence that was much needed in the post-Christmas lull!
 |
| Wrapped and ready |
Fancy giving free motion embroidery a go? You might find it useful to have an embroidery hoop to hand to keep your fabric taut and either lower your feed dogs or cover them with a darning plate. :o)
No comments:
Post a Comment